There is nothing quite like trimming the Christmas tree with handmade heirlooms that bring cozy charm and nostalgic warmth to holiday celebrations. This easy crochet reindeer ornament with branched antlers is the sweetest seasonal make—working up in just 25 minutes using small amounts of worsted weight yarn. Featuring a rustic heather brown face, whimsical stitched sleepy eyes, dimensional perky ears, and a bright cherry-red bobble nose reminiscent of everyone’s favorite red-nosed reindeer, this charming keepsake is perfect for Christmas tree branches, holiday garland bunting, and festive gift toppers.
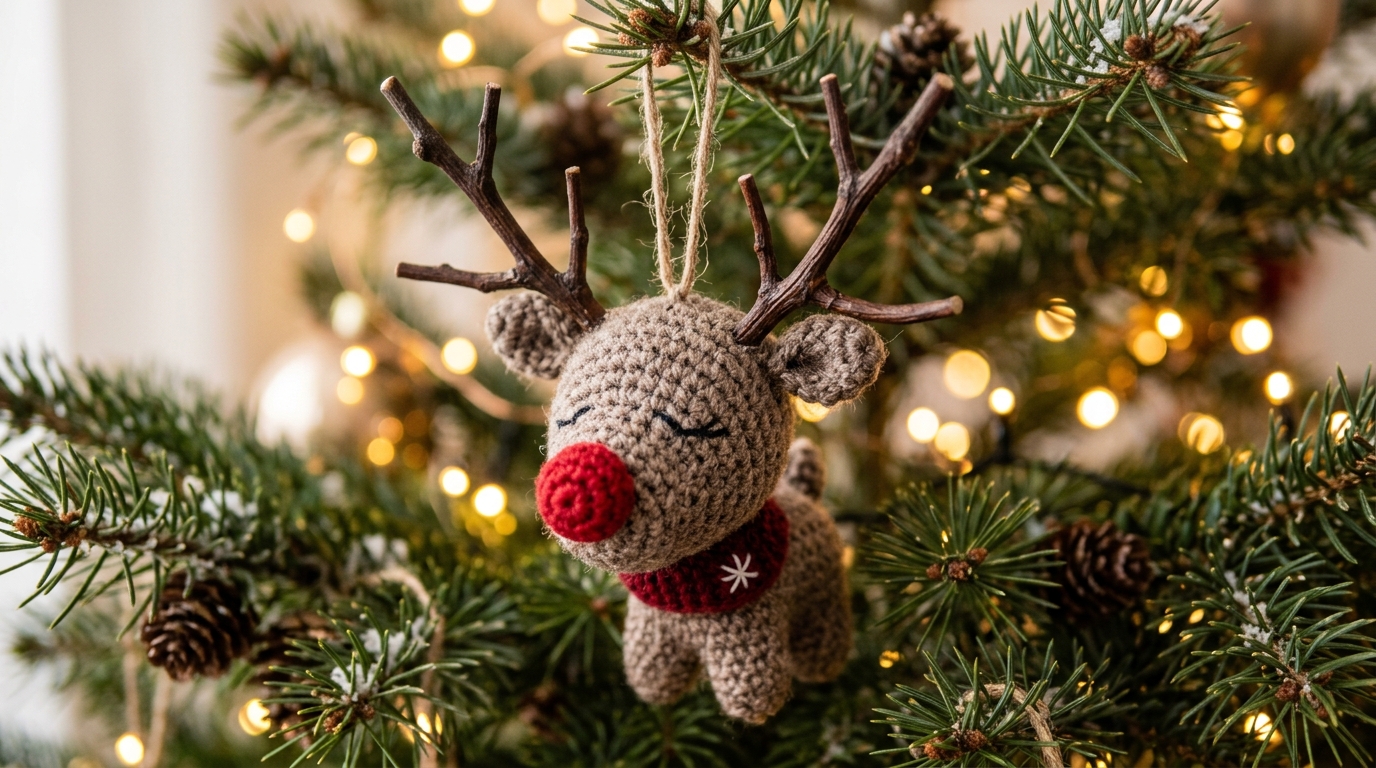
Unlike bulky plush toys that require extensive stuffing and multiple pieces to assemble, this smart flat-round ornament is worked as a sturdy double-layered disc. This ensures it stays crisp, flat, and perfectly upright when suspended from fragrant evergreen branches without spinning or drooping. The branched antlers can be crafted using flexible brown chenille pipe cleaners or structured crochet cord branches, giving you endless customization for your holiday decor style.
Why You’ll Love This Holiday Reindeer Pattern
- Quick 25-Minute Project: Complete an entire ornament from cast-on to final hanging ribbon in less than half an hour.
- Ultimate Scrap Buster: Requires less than 35 yards of total yarn, making it ideal for using up lingering skein ends of brown, red, and cream yarn.
- Double-Sided Durability: Working two joined discs creates an ultra-sturdy, neat ornament that conceals all yarn tails and never bends on the tree.
- Multipurpose Holiday Accent: Gorgeous as tree ornaments, festive table place setting favors, advent calendar surprises, or luxury gift-wrap tags.
Materials & Sizing Specs

- Yarn: Medium Worsted Weight (#4) yarn (cotton or acrylic). Approx. 25 yards of Heather Brown or Oatmeal (Main Color), 5 yards of Cherry Red (Nose), and 5 yards of Dark Chocolate Brown or Cream (Ears & Accents).
- Crochet Hook: US Size E-4 (3.5 mm) ergonomic crochet hook. Using a hook slightly smaller than standard produces tight, crisp stitches that prevent light gaps.
- Antlers: 2 brown chenille craft pipe cleaners (or 10 yards of dark chocolate brown yarn for crocheted branch cords).
- Tapestry Needle: Large blunt eye yarn needle for joining and embroidering eyes.
- Embroidery Floss / Scraps: Black or dark charcoal yarn for sleeping eyelash embroidery.
- Hanging Loop: 8 inches of red-and-white baker’s twine, metallic gold thread, or rustic jute string.
- Finished Dimensions: Approx. 3.75 inches (9.5 cm) in diameter (approx. 5.5 inches tall including antlers).
Step-by-Step Reindeer Ornament Walkthrough

Part 1: The Face Discs (Make 2)
Working in continuous rounds using Heather Brown yarn:
Round 1: Make a Magic Ring. Ch 1, work 6 sc into ring. Pull tail snugly to close center hole. (6 sts)
Round 2: 2 sc in each st around. (12 sts)
Round 3: *1 sc in next st, 2 sc in following st.* Repeat around. (18 sts)
Round 4: *1 sc in next 2 sts, 2 sc in following st.* Repeat around. (24 sts)
Round 5: *1 sc in next 3 sts, 2 sc in following st.* Repeat around. (30 sts)
Fasten off first disc with an invisible join and weave in ends. For the second disc, do not cut the yarn yet if using it for joining.
Part 2: The Red Bobble Nose & Sleepy Eyes
Cherry Red Nose: Using Red yarn, make a magic ring. Ch 2, work a 5-double-crochet bobble stitch (yo, insert hook into ring, yo and pull up a loop, yo and pull through 2 loops; repeat 4 more times until 6 loops on hook; yo and pull through all 6 loops). Ch 1 tightly to secure the bobble. Fasten off leaving a 6-inch tail. Sew securely to the center of the front face disc.
Sleeping Eyes: Thread your tapestry needle with black yarn or embroidery floss. Stitch two gentle upward curving arches on either side of the red nose, adding two tiny diagonal eyelashes to each arch for a peaceful, whimsical expression.
Part 3: Perky Ears (Make 2)
Using Heather Brown yarn:
Ch 5. Starting in 2nd ch from hook: work 1 sc, 1 hdc in next ch, 1 dc in next ch, work (2 dc, ch 2, sl st in 2nd ch, 1 dc) all in the last chain for a pointed ear tip. Working down the opposite side of the foundation chain: 1 dc, 1 hdc, 1 sc. Sl st to initial chain. Fasten off leaving an 8-inch sewing tail. Pinch base of ear slightly to create a natural cupped shape.
Part 4: Antlers & Final Assembly
Chenille Antler Method: Take a 12-inch brown pipe cleaner and fold it in half. Cut two 2-inch segments from a second pipe cleaner and twist them around the main stems to form authentic branched deer antlers. Position the antlers between the front and back discs at the 11 o’clock and 1 o’clock positions.
Joining Discs: Place the front disc and back disc with wrong sides facing together, sandwiching the antler bases and ear tabs between them. Using heather brown yarn, single crochet through both thicknesses all the way around the perimeter. Insert your hanging ribbon at the top center before closing.
3 Pro Tips for Flawless Holiday Ornaments
1. Anchor the Antlers Firmly: Add a small dab of non-toxic fabric glue or take 2 tight whipstitches through the pipe cleaner stem inside the discs before seaming the edge so the antlers remain completely immovable.
2. Use Invisible Finish for Round Discs: When completing your final round, skip the bulky slip stitch. Instead, thread your yarn needle and duplicate the top loops of the next stitch for a seamless circular edge.
3. Add a Subtle Jingle Bell: Thread a tiny 6mm metallic gold or copper jingle bell onto the hanging cord or beneath the chin for delightful holiday music every time the tree branch sways!
Holiday Styling & Gift Presentation

- Evergreen Tree Trimming: Hang at varied branch depths alongside warm golden fairy lights and wooden snowflake ornaments for a rustic Scandinavian holiday aesthetic.
- Handmade Gift Tags: Tie the reindeer ornament to kraft paper gift packages with baker’s twine; it doubles as a bonus keepsake tree ornament for the recipient.
- Holiday Garland: String 6 to 8 reindeer ornaments along a 6-foot length of natural jute rope interspersed with dried orange slices and cinnamon sticks.
Storage & Care for Keepsake Ornaments
- Dust Prevention: Store ornaments in breathable acid-free tissue paper or egg cartons between holiday seasons to protect the antlers and keep fibers crisp.
- Spot Cleaning: Dab gently with a damp microfiber cloth and mild wool wash if needed; lay flat to air dry thoroughly.
Frequently Asked Questions
Can I make the antlers completely from crochet yarn without pipe cleaners?
Yes! For an all-yarn baby-safe option, chain 10 with dark brown yarn, slip stitch back 4 chains, chain 5 for a branch prong, slip stitch down that branch, then resume slip stitching to the base. This creates a flexible, 100% fiber antler.
What yarn weight works best for tree ornaments?
Medium worsted weight (#4) cotton or acrylic is best. Cotton provides crisp stitch definition and holds its shape without drooping, while wool/acrylic blends provide fuzzy rustic warmth.
How long does one reindeer ornament take to make?
A confident beginner can easily finish an ornament from start to finish in 20 to 25 minutes, making it one of the quickest craft fair and holiday gift projects available.
Pin This Holiday Pattern for Later
Love this cozy Christmas make? Save this pin to your Holiday Crochet board on Pinterest so you have it ready whenever you decorate or prep holiday gifts!