Few textures in the fiber arts world are as instantly recognizable or universally beloved as the three-dimensional crochet waffle stitch. With its raised geometric grid lines flanking deep, squishy recessed square pockets, the waffle stitch looks intricate and intimidating to beginners, yet it is created by repeating just two simple rows. Whether you are aiming to crochet plush dishcloths, thick thermal baby blankets, cozy cold-weather scarves, or statement home pillows, this comprehensive masterclass breaks down the stitch mechanics step-by-step so you can crochet crisp, perfectly square waffle fabric with zero edge curling.
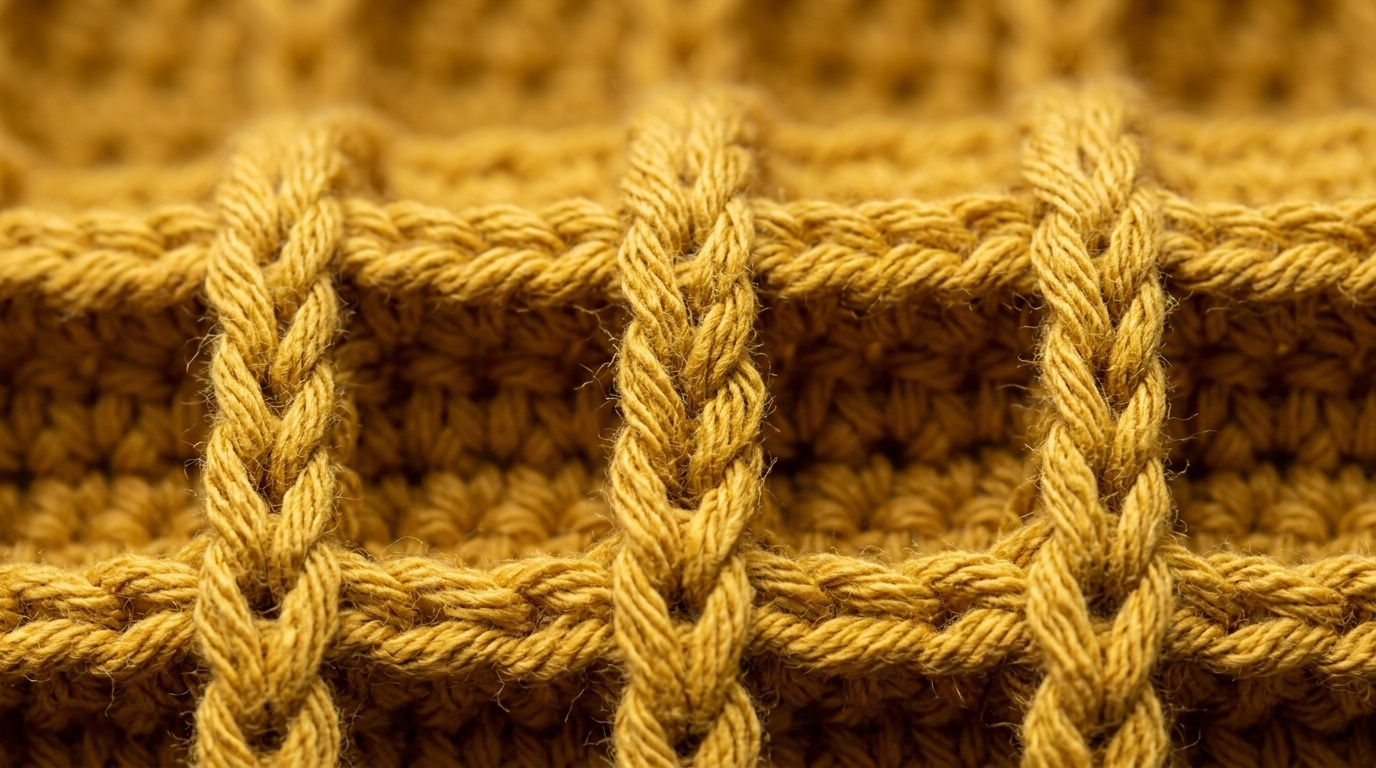
At its core, the waffle stitch is powered by alternating standard double crochets with Front Post Double Crochets (FPDC). While standard stitches enter into the top horizontal loops of the previous row, a front post stitch reaches down and wraps around the vertical structural stem of the stitch below. This simple adjustment forces the stitch forward toward you, forming a sturdy 3D architectural pillar. When stacked across consecutive rows, these pillars construct a double-thick, highly elastic fabric that traps warmth and soapy suds with ease.
Why You’ll Love the Waffle Stitch
- Hypnotic 2-Row Rhythm: Once your foundation row is established, the pattern becomes purely rhythmic muscle memory—ideal for relaxing evening crochet.
- Squishy Double Thickness: Because post stitches overlap vertically, the finished fabric is naturally twice as thick and insulating as standard flat stitches.
- Reversible Geometric Appeal: While the front face exhibits sharp waffle squares, the reverse side reveals a gorgeous mini-brickwork basketweave texture.
- Universal Project Flexibility: Scale the foundation chain to make anything from a 4-inch mug rug to a luxurious king-sized living room blanket.
Yarn Recommendations, Hook Choice & Notions

- Yarn Selection: For learning the stitch, choose a smooth, plied yarn in a light or medium solid color (such as golden mustard, cream, or soft sage). 100% Cotton (e.g. Lion Brand 24/7 Cotton) produces razor-sharp stitch definition for kitchen makes, while Wool or Acrylic blends provide incredible drape for blankets and scarves.
- Crochet Hook: Size 4.5 mm or 5.0 mm (US H-8) ergonomic hook with a tapered head to effortlessly slide behind stitch posts.
- Notions: 2 locking stitch markers (to place in turning chains) and a bent-tip tapestry needle.
- Skill Level: Confident Beginner (basic double crochet mastery).
Stitch Glossary, Abbreviations & Foundation Math
This tutorial is written in standard US Crochet Terminology.
- Ch: Chain
- St(s): Stitch(es)
- Dc (Double Crochet): Yarn over, insert hook into indicated st, yarn over and pull up loop (3 loops on hook), [yarn over, pull through 2 loops] twice.
- FPDC (Front Post Double Crochet): Yarn over, insert hook from front to back, then back to front around the vertical post of the stitch in the row below. Yarn over and pull up a loop to current row height (3 loops on hook), [yarn over, pull through 2 loops] twice.
The Foundation Formula: To make the waffle stitch any custom width, chain a multiple of 3 + 2 (or multiple of 3 + 4 if counting the turning chain as a stitch). For example: 32 chains (30 + 2) for an 8.5-inch dishcloth, or 122 chains (120 + 2) for a squishy baby blanket.
Step-by-Step Row-by-Row Stitch Walkthrough
Foundation Chain: Ch 23 (Multiple of 3 = 21, plus 2 extra chains for foundation offset).
Row 1 (Foundation Setup Row): Dc in the 3rd ch from hook (skipped 2 chs do not count as a stitch). Dc in each remaining chain across to the end. Turn your work. [Total: 21 dc]
Row 2 (Defining the Waffle Ridges): Ch 2 (acts as height riser, does not count as st). *FPDC around the vertical post of the first st, dc into the top loops of each of the next 2 sts*. Repeat from * to * across the row until 1 st remains. FPDC around the post of the final dc. Turn. [21 sts: 8 FPDC ridges, 13 Dc bases]

Row 3 (Recessed Square Row): Ch 2 (does not count as st). *Dc into the top loops of the first st, FPDC around the posts of each of the next 2 sts*. Repeat from * to * across until 1 st remains. Dc into the top loops of the final st. Turn. [21 sts]
Rows 4 and Beyond: Simply repeat Row 2 and Row 3 alternately! You will see the dimensional square waffle chambers emerge right before your eyes by Row 4.
3 Studio Secrets for Razor-Sharp Waffle Borders
1. Treat Ch-2 as a Turning Riser Only: Most older patterns count the Ch-2 turning chain as a stitch, leaving floppy triangular gaps along your margins. We treat Ch-2 strictly as a turning riser (never a stitch) and place our first stitch directly into the very first base stitch. This creates laser-straight vertical borders that never wave.
2. The Loop Height Rule (Fix Curling): If your swatch curls upward at the corners, you are choking the FPDC loops! When wrapping around the lower post, draw your loop upward until it matches the full height of your row before pulling through. Relaxed post tension completely eliminates curl.
3. Wet-Block Cotton Once: Pure unmercerized cotton locks its square geometry permanently into memory after a quick 10-minute lukewarm soak followed by flat air drying.
Project Applications & Inspiration

Now that you have mastered the waffle stitch, put your new skill to work with our free patterns:
- Kitchen Essentials: Put your waffle stitch skills to practical use immediately with our Farmhouse Waffle Stitch Crochet Dishcloth and Hanging Kitchen Towel.
- Home Living: Combine your waffle textured makes with our Double-Thick Thermal Pot Holder for the ultimate handmade kitchen trio.
- Cozy Living Pairings: Crafting is even sweeter with comforting treats—try Marcus Cole’s warm cottage cheese rolls for your next tea break.
Fabric Care & Post-Wash Maintenance
Proper care preserves the rich 3D texture of waffle fabric over years of use:
- Machine Washing: Wash in warm or cool water on gentle cycle. Cotton waffle tightens up squishier and softer after each wash.
- Avoid Silicone Softeners: Fabric softeners coat cotton fibers and diminish absorbency. Use half a cup of distilled white vinegar in the rinse cycle instead.
- Drying: Tumble dry on low to medium heat or lay flat to dry in the breeze.
The Waffle Stitch Masterclass
Authored & Tested by Elena Hayes • Senior Fiber Arts Editor
Studio Testing Note: Studio-tested with both worsted cotton and bulky wool. Non-counting Ch-2 riser technique guarantees razor-straight borders without flares.
Frequently Asked Questions
Does the waffle stitch use more yarn than regular double crochet?
Yes. Because front post double crochets overlap vertically and draw extra fiber into the raised ridges, the waffle stitch consumes approximately 25% to 30% more yarn than flat double crochet.
Why are my waffle edges leaning or flaring outwards?
Check your stitch count at the end of every row. Flaring happens when beginners accidentally place a stitch into the turning chain. Remember: the turning Ch-2 does NOT count as a stitch!
Can I make a blanket with this stitch without it being too heavy?
Yes! For blankets, choose a lightweight Category 3 (DK) yarn or a soft acrylic/wool blend with a 5.5 mm or 6.0 mm hook. This keeps the waffle squishy and flexible without excessive weight.
Pin This Stitch Tutorial for Later
Want to master beautiful textured crochet stitches? Save this pin to your Crochet Stitches, Crochet Tutorials, or Free Crochet Patterns boards on Pinterest so you have the instructions ready whenever you pick up your hook!