There is a quiet, timeless enchantment in handmade holiday heirlooms passed down through generations, and this crochet snowflake ornaments pattern free tutorial lets you create delicate, crystalline tree ornaments in just fifteen minutes each. Spun from natural unbleached cotton and blocked with crisp picot points, these lightweight lace snowflakes transform your Christmas tree into a cozy Scandinavian winter wonderland.
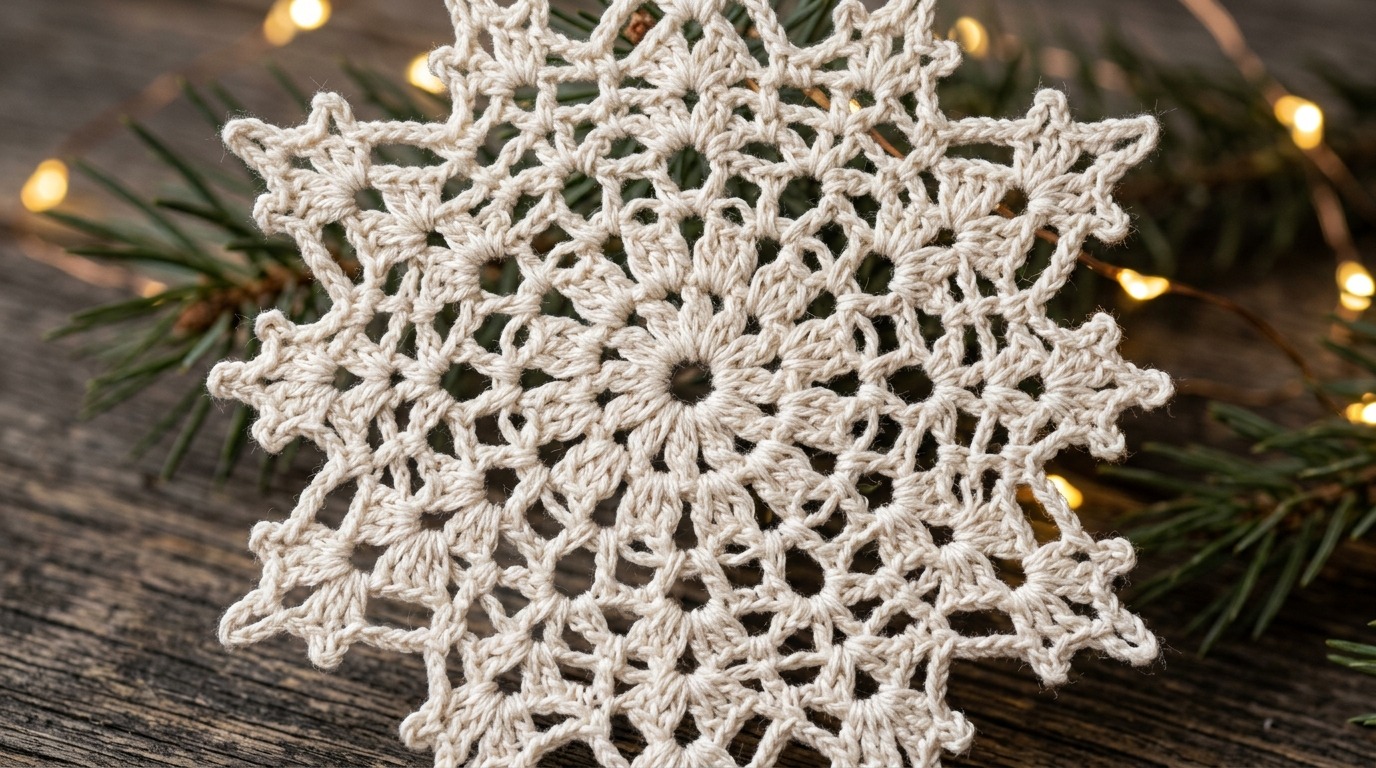
While lace crochet often intimidates beginners with fine threads and tiny steel hooks, our farmhouse snowflake pattern is cleverly designed to work with everyday fingering or sport-weight cotton yarn and an easy-to-grip 3.0mm hook. Worked over just four quick rounds, the lacy spokes expand radially from a central magic circle and finish with crisp pointed picots. Paired with our fool-proof natural sugar-water stiffening technique, your snowflakes will hold their crisp star shape year after year without yellowing.
Why You’ll Love This Pattern
- 15-Minute Quick Project: With only four short rounds, you can easily crochet an entire baker’s dozen of snowflakes over a cozy weekend.
- Beginner-Friendly Lace: Uses standard beginner stitches—chains, single crochets, double crochets, and simple picots—with zero complicated lace charts.
- Non-Toxic Sugar Stiffening Guide: Master our grandmother-tested natural sugar glaze formula that dries rock-hard, crystal clear, and completely odor-free.
- Endless Festive Uses: Perfect as Christmas tree baubles, window garland bunting, rustic wine bottle accents, or reusable gift package toppers.
Recommended Materials & Notions

- Fine Sport or Fingering Weight Cotton Yarn (Category 1 or 2): 100% natural mercerized or unmercerized cotton in Crisp Snow White or Natural Cream Ecru (approx. 15–20 yards per snowflake).
- 3.0mm (US D-3) Wooden Ergonomic Crochet Hook: Provides comfortable control and clean, uniform loop definition.
- Natural Unfinished Wooden Beads: Slipped onto the jute twine hanging loop for a minimalist Nordic aesthetic.
- Raw Jute Twine or Metallic Gold Thread: For hanging loops and gift wrapping.
- Rust-Proof Blocking Pins & Foam Board: Essential for pinning out each picot tip during the stiffening process.
- Granulated White Sugar & Water: The classic natural stiffening recipe (equal parts 1:1 ratio).
- Debossed Leather Accent Tag (‘YumYum’): Adds an artisanal maker signature to holiday gift packaging.
Step-by-Step Snowflake Walkthrough
1. The Center Ring (Round 1): In a magic ring, chain 3 (counts as first DC), work 11 double crochets into the ring. Slip stitch to the top of beginning chain-3 to join (12 DC total). Pull the ring closed snugly.

2. Lacy Spoke Arches (Round 2): Chain 1, single crochet in first stitch. *Chain 5, skip 1 stitch, single crochet in next stitch.* Repeat from * to * around, ending with chain 2 and double crochet into the first single crochet to form the 6th loop (6 chain-5 arches).
3. Cluster Shells (Round 3): Chain 1, single crochet into the current loop. *In the next chain-5 space work (2 DC, chain 3, 2 DC), single crochet in next chain-5 space.* Repeat around to form 6 symmetrical shell clusters.
4. Outer Picot Star Points (Round 4): Slip stitch into the center of the first shell. *In the chain-3 space work (SC, chain 3, slip stitch in 3rd chain for picot, DC, chain 5, slip stitch in 5th chain for long center picot, SC, chain 3, slip stitch for picot), chain 3, slip stitch into next valley.* Repeat around to create 6 dramatic pointed branches. Fasten off and weave in ends.
The Secret to Rock-Hard, Non-Sticky Snowflakes
1. The 1:1 Sugar Water Glaze: In a small saucepan, bring equal parts granulated white sugar and boiling water (e.g., 1/2 cup sugar to 1/2 cup water) to a simmer until completely clear and dissolved. Let cool until warm to the touch.
2. Submerge & Press: Dip your completed snowflakes into the sugar syrup, gently squeeze out the excess liquid between clean paper towels (do not wring!), and lay them onto wax paper over a foam blocking board.
3. Pin Every Picot Point: Place a rust-proof pin through the center of every single outer picot loop, stretching the points outward tautly into crisp symmetry. Allow to dry undisturbed for 24 hours until completely rigid and glass-like.
4 Festive Ways to Display Your Crochet Snowflakes

- Christmas Tree Hanging Ornaments: String with natural jute twine and a raw wooden bead to hang alongside our mini crochet Christmas stockings for a coordinated vintage holiday aesthetic.
- Artisanal Gift Package Toppers: Tie a stiffened snowflake directly over simple brown kraft paper parcels tied with twine for an unforgettable unboxing experience.
- Window Garland Bunting: Space 8 to 10 snowflakes along fine invisible fishing line or jute cord across a sunny window to catch the morning winter frost.
- Holiday Table Place Setting Accents: Rest a snowflake on each folded linen napkin at your Christmas dinner table as a charming take-home party favor.
Care, Cleaning & Seasonal Preservation
- Protect from Humidity: Sugar-stiffened ornaments must be stored in a completely dry, airtight plastic container or metal tin during the off-season.
- Flat Layering: Layer snowflakes between sheets of wax paper or parchment paper so the delicate points do not catch on one another.
- Re-Stiffening: If a snowflake loses its crispness after several years, simply rinse in warm water to dissolve the old sugar glaze, reshape, and re-pin with fresh syrup.
Heirloom Lace Crochet Snowflake Ornament
By Elena Hayes • Category: Beginner Patterns • Skill Level: Easy / Confident Beginner
Materials Required
- Fine sport or fingering cotton yarn in Natural Ivory (approx. 18 yds per snowflake)
- 3.0mm ergonomic wooden crochet hook
- Tapestry needle & craft scissors
- Rust-proof blocking pins & foam blocking mat
- Granulated sugar & boiling water (1:1 ratio for stiffening)
- Unfinished wooden beads & jute twine for hanging
Pattern Abbreviations (US Terms)
mr: magic ring | ch: chain | sc: single crochet | dc: double crochet | sl st: slip stitch | picot: chain 3 (or 5), slip stitch into first chain
Written Pattern Instructions
- Round 1: In MR, ch 3 (counts as dc), 11 dc. Sl st to top of ch-3 to join (12 dc). Pull ring tight.
- Round 2: Ch 1, sc in first st. *Ch 5, sk 1 st, sc in next st* 5 times. Ch 2, dc in first sc to complete 6th loop (6 loops).
- Round 3: Ch 1, sc in current space. *In next loop work (2 dc, ch 3, 2 dc), sc in next loop* around. Sl st to join.
- Round 4 (Picot Edging): *In ch-3 space work (sc, ch-3 picot, dc, ch-5 center picot, sc, ch-3 picot), ch 3, sl st between shells* around. Fasten off and weave in tails.
- Stiffening: Dip in 1:1 sugar water, press out excess, pin out every picot point on foam board, dry for 24 hrs.
Frequently Asked Questions
Will sugar-stiffened crochet snowflakes attract ants or bugs?
No! The sugar solution dries into a non-sticky, glass-like crystalline polymer. When kept indoors in climate-controlled spaces, pests do not detect or consume dried sugar-glazed cotton.
Can I use craft glue or fabric stiffener instead of sugar?
Yes, a 1:1 mixture of water and clear Elmer’s craft glue or commercial Mod Podge Stiff Stuff works well. However, natural sugar water gives the most glass-like, authentic sparkle under Christmas tree lights.
Can I make larger snowflakes with worsted yarn?
Yes! Using worsted weight yarn and a 4.5mm hook produces large, stunning 7-inch statement snowflakes that make incredible wall hangings or window displays.
Pin This Pattern for Later
Love handmade holiday heirlooms? Save this easy crochet snowflake ornament pin to your Christmas crochet board on Pinterest!