There is no crochet motif more iconic, versatile, or utterly timeless than the classic granny square. Whether you dream of stitching a vibrant heirloom patchwork afghan, a trendy boho cardigan, or quick festive coasters, mastering this beginner-friendly 4-round motif is the ultimate rite of passage in your crochet journey. Built with simple double crochet clusters and chain spaces worked in the round, granny squares work up in just 15 minutes, lay perfectly flat, and let you transform leftover scrap yarn into stunning handmade treasures.
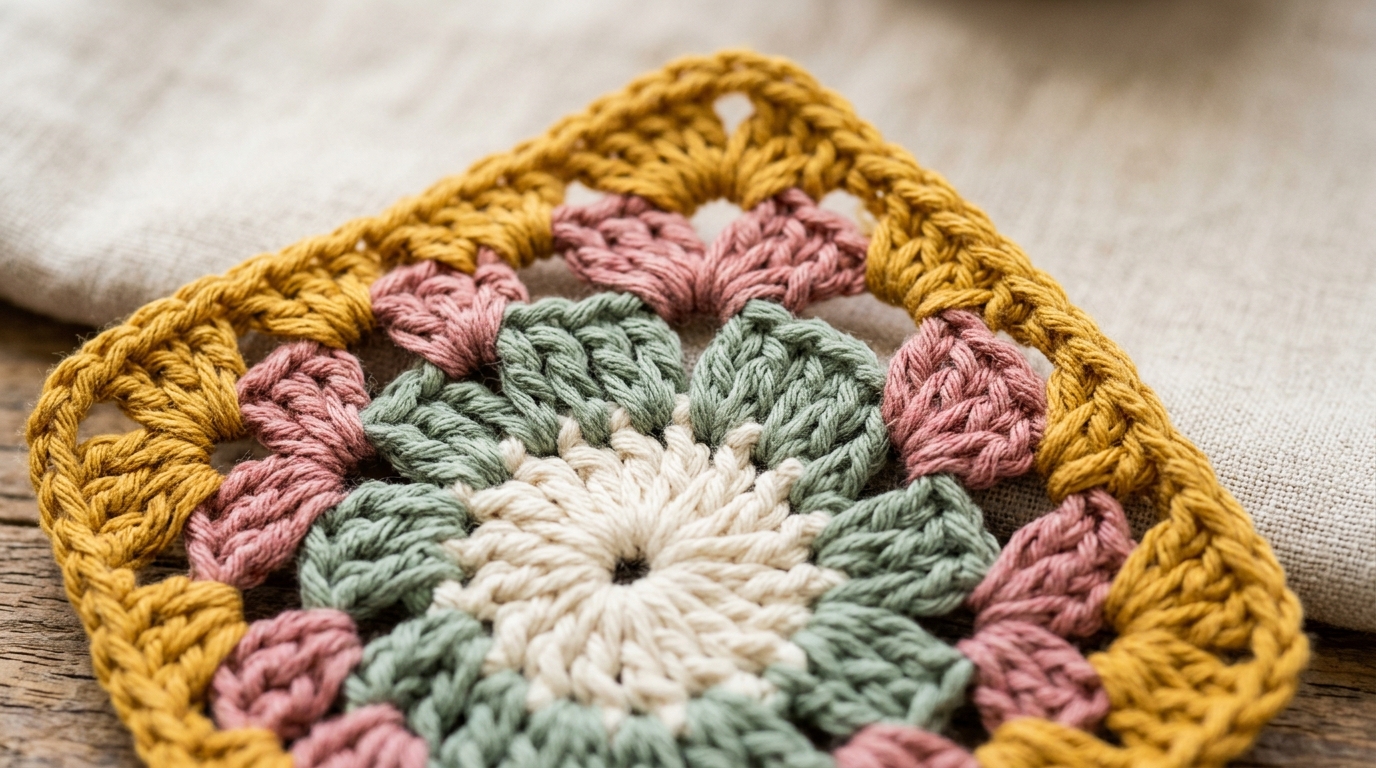
Unlike complex lace stitches that demand constant counting or intricate cable twists, the genius of the traditional granny square lies in its rhythmic, forgiving geometry. Once you complete the foundational circle of Round 1, every subsequent round simply repeats the exact same pattern: groups of three double crochets (known across craft traditions as “granny clusters”) separated by chain spaces. Because stitches are worked directly into spacious openings rather than tiny individual stitch loops, it is extraordinarily easy on the eyes and ideal for relaxed evening crafting.
Why You’ll Love Making Classic Granny Squares
- Instant Gratification: A single four-round square takes only 12 to 15 minutes to complete from initial center ring to final slip knot.
- The Ultimate Stash Buster: Perfect for using up odd leftover lengths and partial skeins of yarn across your craft basket.
- Portable Project Friendly: Crochet individual motifs on your commute, at coffee shops, or during family road trips without carrying bulky blankets.
- Infinite Project Possibilities: Join them into cozy throw blankets, tote bags, pillow covers, table runners, or vintage retro cardigans.
Materials & Sizing Specs

- Yarn: Approx. 25–30 yards total of Worsted Weight (#4) Yarn per 4-round square. We recommend premium acrylic or 100% worsted cotton (such as Lion Brand 24/7 Cotton, Paintbox Simply Aran, or Caron Simply Soft). Four colors (A, B, C, D) create classic retro contrast.
- Crochet Hook: US Size H-8 (5.0 mm) bamboo or ergonomic metal hook. Pairing a 5.0mm hook with worsted yarn ensures flexible drape without stiff, tight fabric.
- Tapestry Needle: Large-eye blunt blunt needle for weaving in tails cleanly on the back of each color round.
- Scissors & Tape Measure: Sharp snips for clean yarn cuts and checking finished square dimensions.
- Finished Dimensions: A standard 4-round granny square measures approximately 4.5 x 4.5 inches (11.5 x 11.5 cm) unblocked.
- Skill Level: Absolute Beginner (requires only Chain, Slip Stitch, and Double Crochet).
Crochet Abbreviations & Anatomy (US Terms)
- ch: Chain stitch
- sl st: Slip stitch
- dc: Double crochet
- sp(s): Space(s)
- ch-sp: Chain space (the physical hole created by chain stitches in the previous round)
- Granny Cluster: A group of 3 double crochet stitches worked into the same chain space
Step-by-Step Classic Granny Square Walkthrough

Round 1: The Center Circle & Foundation Corners
1. Starting Ring: With Color A (Cream), make a Magic Ring (or ch 4 and join with a sl st to the first chain to form a small ring).
2. First Cluster: Ch 3 (this counts as your first double crochet throughout). Work 2 dc directly into the center ring. You now have your first 3-dc granny cluster.
3. Corner 1: Ch 2 to establish your first corner turn.
4. Clusters 2 to 4: Work [3 dc into ring, ch 2] three more times. You will have a total of 4 clusters and 4 corner chain spaces.
5. Join & Finish: Pull magic ring tail tight to close center hole. Sl st to the top of the beginning ch-3 to join. Fasten off Color A. (12 dc, 4 ch-2 spaces)
Round 2: Expanding the Four Corners
1. Join New Color: Attach Color B (Sage Green) with a slip stitch into any corner ch-2 space.
2. First Corner (Half): Ch 3, 2 dc into the same corner space, ch 2, 3 dc into the same corner space. (First full corner completed: 3 dc, ch 2, 3 dc).
3. Side Transition: Ch 1 to jump across to the next corner.
4. Remaining Corners: In each of the next three corner spaces, work [3 dc, ch 2, 3 dc], followed by ch 1.
5. Join & Finish: After your final ch 1, sl st to the top of beginning ch-3. Fasten off Color B. (24 dc, 4 corner ch-2 spaces, 4 side ch-1 spaces)
Round 3: Adding Straight Sides
1. Join New Color: Attach Color C (Dusty Rose) in any corner ch-2 space.
2. Corner: Ch 3, 2 dc, ch 2, 3 dc in the same corner space.
3. Side Cluster: Ch 1. In the side ch-1 space along the edge, work 3 dc. Ch 1.
4. Repeat Around: *In the next corner ch-2 space, work [3 dc, ch 2, 3 dc]. Ch 1. In the side ch-1 space, work 3 dc. Ch 1.* Repeat from * around all sides.
5. Join & Finish: Sl st to top of beginning ch-3. Fasten off Color C. (36 dc total, 4 corners, 4 side clusters)
Round 4: The Framing Border Round
1. Join Border Color: Attach Color D (Mustard Gold or Natural Cream) in any corner ch-2 space.
2. Corner: Ch 3, 2 dc, ch 2, 3 dc in same corner space.
3. Straight Edges: *Ch 1, 3 dc in next side ch-1 sp, ch 1, 3 dc in next side ch-1 sp, ch 1. In corner ch-2 sp, work [3 dc, ch 2, 3 dc].* Repeat from * around all sides.
4. Final Join: Work ch 1 after final side cluster, sl st to top of beginning ch-3. Fasten off yarn leaving a 6-inch tail for weaving in. (48 dc total: 4 corners + 8 side clusters)
3 Golden Rules for Perfectly Flat Granny Squares
1. Turn Your Work Every Round (The Anti-Twist Secret): If your squares start swirling in the center like a pinwheel, flip your work over between rounds! Working with right side facing on odd rounds and wrong side facing on even rounds balances stitch pull and keeps edges razor-straight.
2. Watch Your Chain Tension in Corners: If your corners buckle or ruffle, your corner chains are too loose. Switch from ch-2 to ch-1 in corners if you are a loose crocheter.
3. Wet Block with Wooden Pegs: Soak completed squares in lukewarm water with a drop of wool wash for 10 minutes, gently squeeze out moisture between clean towels, and pin them onto a wooden blocking board. Once dry, every corner will align with 90-degree perfection.
Styling & Creative Project Ideas

Once you build a collection of granny squares, the creative design possibilities are limitless:
- Heirloom Patchwork Afghan: Join 64 squares (8×8 grid) with an invisible slip stitch seam and a scalloped border for a full couch throw.
- Boho Tote Bag: Assemble 13 traditional squares into the viral origami-style market shoulder tote.
- Modern Mug Rugs: Stop after Round 3, add 1-inch fringe tassels along two opposing sides, and use them as adorable boho drink coasters.
- Festive Holiday Bunting: Crochet squares in forest green, cranberry red, and cream, then join with a long chain cord to hang above your fireplace mantel.
Frequently Asked Questions
How do I change colors cleanly in a granny square?
Fasten off your working color completely at the end of each round and weave the tail into the back stitches. Then, start your new color by joining with a slip stitch into any corner chain space. This staggers your starting points so the join is completely invisible.
Why is my granny square curling up into a bowl?
Curling is almost always caused by tight tension or skipping chain spaces between clusters. Ensure you work ch-1 between side clusters and ch-2 at corners. If tension is naturally tight, bump up your hook size from 5.0mm to 5.5mm (US I-9).
What is the best stitch to join granny squares together?
The flat slip stitch join and the mattress stitch using a tapestry needle both produce sleek, professional seams. For decorative raised texture, single crocheting squares together on the right side creates lovely vintage ridges.
Pin This Pattern for Later
Love this classic crochet pattern? Save this pin to your Crochet for Beginners board on Pinterest so you have it ready whenever inspiration strikes!