There is a timeless, hypnotic rhythm to crocheting the classic chevron ripple stitch. Recognized by its iconic undulating zigzags, dramatic sharp peaks, and gentle sloping valleys, this heritage stitch pattern is widely considered the ultimate foundation for heirloom afghan blankets, cozy fall sofa throws, and textured home accents. By balancing symmetrical double crochet increases at the peaks with paired decreases in the valleys, this beginner-friendly tutorial breaks down the essential 1-row repeat formula that ensures your side edges stay perfectly straight and your zigzags remain impeccably sharp across hundreds of rows.
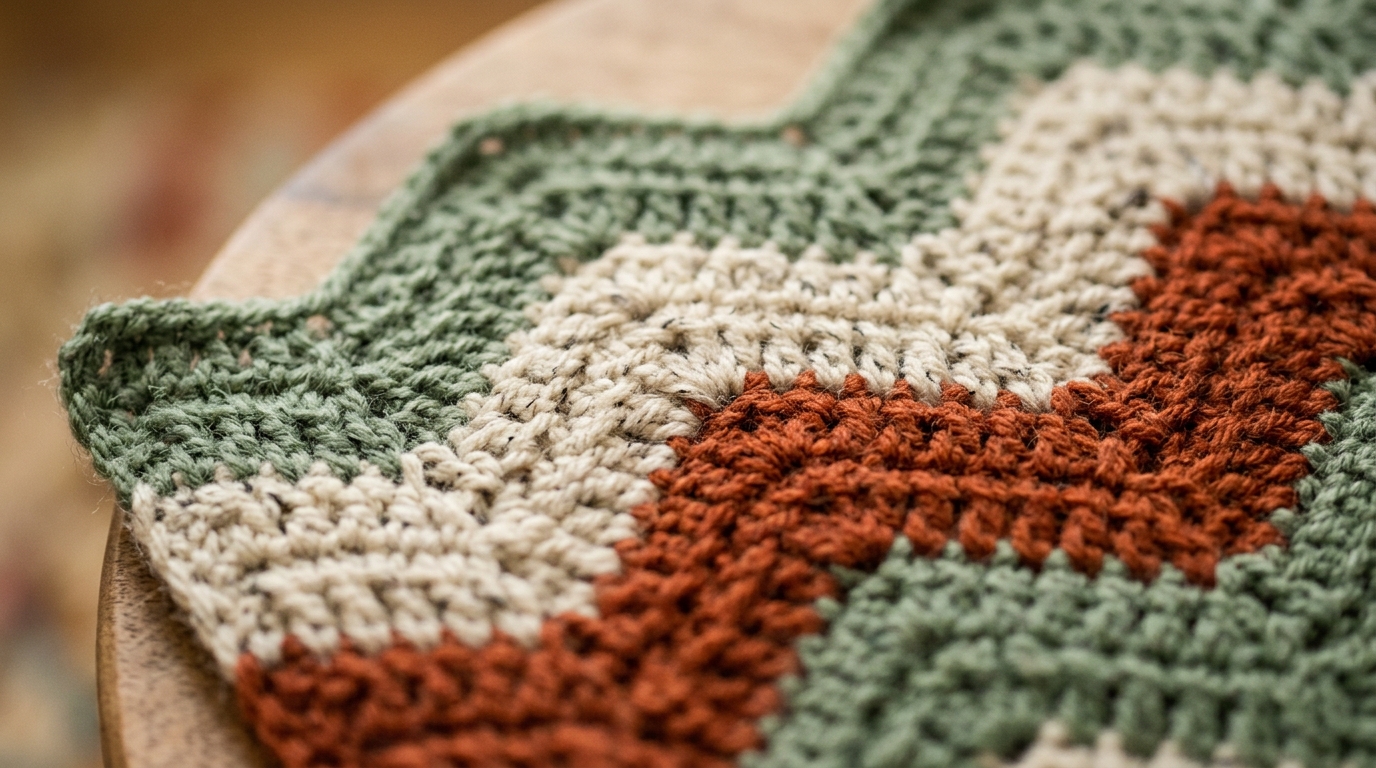
Unlike complex lace charts that demand constant counting and frequent frog-backs, the chevron ripple settles into muscle memory after just two rows. The secret to mastering the ripple lies in understanding the stitch multiple: working a balanced multiple of 14 stitches plus 3 allows you to scale this pattern seamlessly from a compact baby blanket or scarf up to a sprawling king-size bedspread. Worked in alternating earthy stripes of sage green, warm oatmeal, and rust terracotta, it brings modern Scandinavian warmth to any living space.
Why You’ll Love the Chevron Ripple Stitch
- Effortless 1-Row Repeat: Once your foundation row is established, every subsequent row mirrors the exact same sequence of peaks and valleys.
- The Ultimate Blanket Pattern: Creates generous drape, cozy thermal thickness, and natural geometric movement without stiff seams.
- Perfect for Color Striping: Seamlessly accommodates bold high-contrast stripes, subtle tone-on-tone gradients, or scrap yarn stash-busting palettes.
- Reversible & Lay-Flat Texture: Both sides of the fabric look identical and the edges remain crisp without rolling inward.
Materials & Sizing Specs

- Yarn: Medium Worsted Weight (#4) yarn (acrylic, wool, or cotton blend). For a generous 50 x 60 inch throw blanket, you will need approx. 1,800–2,000 total yards divided evenly among 3 to 4 coordinating colors (e.g., Sage Green, Oatmeal Cream, and Terracotta).
- Crochet Hook: US Size H-8 (5.0 mm) or I-9 (5.5 mm) ergonomic crochet hook. Using a hook with smooth glide ensures uniform stitch tension across decrease valleys.
- Tapestry Needle: Large blunt yarn needle for weaving in color change tails.
- Stitch Multiple: Multiple of 14 plus 3 for the foundation chain.
- Standard Blanket Sizing Reference:
- Baby Blanket (30″ x 36″): Chain 98 + 3 = 101 chains (7 chevron repeats).
- Throw Blanket (50″ x 60″): Chain 168 + 3 = 171 chains (12 chevron repeats).
- Twin Bedspread (66″ x 90″): Chain 224 + 3 = 227 chains (16 chevron repeats).
- Skill Level: Confident Beginner (familiar with double crochet and dc2tog decreases).
Step-by-Step Chevron Ripple Walkthrough

Key Stitch Abbreviations
ch: chain | dc: double crochet | st(s): stitch(es) | sk: skip | dc2tog (Double Crochet 2 Together): Yo, insert hook in next st, yo and pull up loop, yo and pull through 2 loops (2 loops on hook). Yo, insert hook in following st, yo and pull up loop, yo and pull through 2 loops (3 loops on hook). Yo, pull through all 3 loops on hook.
Row 1: Establishing the Foundation Peaks & Valleys
Step 1 (Cast On): Ch 45 for a practice swatch (3 repeats of 14 = 42, plus 3).
Step 2 (First Edge Rise): Work 2 dc in the 4th ch from hook (the skipped 3 chains count as your first dc).
Step 3 (Downslope): Work 1 dc in each of the next 4 ch.
Step 4 (The Valley): Skip the next 2 ch.
Step 5 (Upslope): Work 1 dc in each of the next 4 ch.
Step 6 (The Peak): Work 3 dc in the next ch.
Step 7: Repeat Steps 3 through 6 across your chain until 5 ch remain: work 1 dc in each of the next 4 ch, then work 3 dc in the final ch. Turn.
Row 2: The Master 1-Row Repeat Formula
Step 1: Ch 3 (counts as first dc). Work 2 dc in the very first st at the base of the ch-3.
Step 2: Work 1 dc in each of the next 4 sts.
Step 3 (Valley Decrease): Skip the next 2 sts (these are the two center valley stitches from the row below).
Step 4: Work 1 dc in each of the next 4 sts.
Step 5 (Peak Increase): Work 3 dc in the next st (which is the center stitch of the 3-dc peak group from the row below).
Step 6: Repeat Steps 2 through 5 across the row until you reach the final turn. Work 1 dc in each of the last 4 sts, then work 3 dc into the top of the turning chain-3. Turn.
Subsequent Rows: Simply repeat Row 2 for the entire body of your blanket, changing yarn colors every 4, 6, or 8 rows as desired.
3 Chef Secrets for Sharp, Symmetrical Ripples
1. Always Target the Center Peak Stitch: The most common ripple mistake is working the 3-dc increase into the wrong stitch. Always visually confirm that your hook is entering the second (middle) stitch of the 3-dc group from the previous row. This keeps your peak angles vertically aligned.
2. Clean Color Transitions at the Row End: When changing colors for a new stripe, work your final double crochet until 2 loops remain on hook. Drop the current color, pick up the new yarn color, pull it through the final 2 loops to complete the stitch, and turn. This prevents unsightly color blips on your edges.
3. Don’t Skip Counting the Slopes: Always ensure you have exactly 4 double crochets between every peak and valley. If your blanket starts sloping diagonally, count the slope stitches immediately to catch misplaced increases.
Styling & Blanket Living Accents

- Farmhouse Sofa Throw: Drape across the back of a neutral leather or linen couch for instant texture and cozy warmth during chilly autumn evenings.
- Playful Nursery Afghan: Work in modern soft pastels like blush pink, sage, and buttercream for a timeless, heirloom baby shower gift.
- Fringe Accents: Add 5-inch knotted yarn tassels to the pointed peak ends along the top and bottom borders for a relaxed boho finish.
Care & Long-Term Preservation
- Washing Instructions: Machine wash on gentle cycle in cold water inside a large mesh wash bag, or hand wash gently in lukewarm water.
- Drying & Blocking: Lay flat to dry over clean bath towels, gently smoothing the zigzag peaks and valleys with your hands into straight geometric lines.
Frequently Asked Questions
Why are my side edges shrinking inward?
Shrinking edges occur when the final 3-dc increase into the top of the turning chain is accidentally omitted, or when the initial 2 dc in the first stitch are forgotten. Always begin and end every row with a 3-dc cluster.
Can I make this ripple using single crochet or half double crochet?
Yes! You can adapt this exact formula to half double crochet (hdc) or single crochet (sc). The only difference is replacing the 4 dc on each slope with 4 hdc or 4 sc, and adjusting your turning chains accordingly.
How do I straighten the bottom and top wavy edges if I want flat borders?
To square off a chevron blanket, you can work fill-in triangle rows along the top and bottom using descending stitch heights (trebles in the valleys, single crochets at the peaks) before adding a flat border.
Pin This Tutorial for Later
Love this timeless blanket stitch? Save this pin to your Crochet Stitches & Blankets board on Pinterest so you have the 1-row formula ready for your next cozy throw!